LDR calibration
Calibration in brief
Calibration is a self-contained measurement system that measures and records the resistance of each LDR against a 100-step attenuation schedule. The control command needed to achieve each targeted resistance step gets stored in permanent memory and subsequently used to set the resistance level of each LDR during normal operation.
-
Built-in software driven process
-
Normalizes LDR performance without need for pre-matched LDRs
-
Requires no special or external equipment
-
Only runs when preamp is otherwise offline and not operating normally
-
Once started runs automatically without any user intervention
-
Corrects for any drift as LDRs age
-
Allows LDRs to be replaced if needed thus extending the life of the pramp indefinitely
Why is LDR calibration a thing?
Using LDRs for audio volume control is technically challenging because the relationship between control current and resistance within each LDRs is highly nonlinear, can vary considerably from one individual LDR to the next, and can also change over time as an LDR ages. This nonlinearity is clearly evident in the resistance versus control current shown in the graph below.
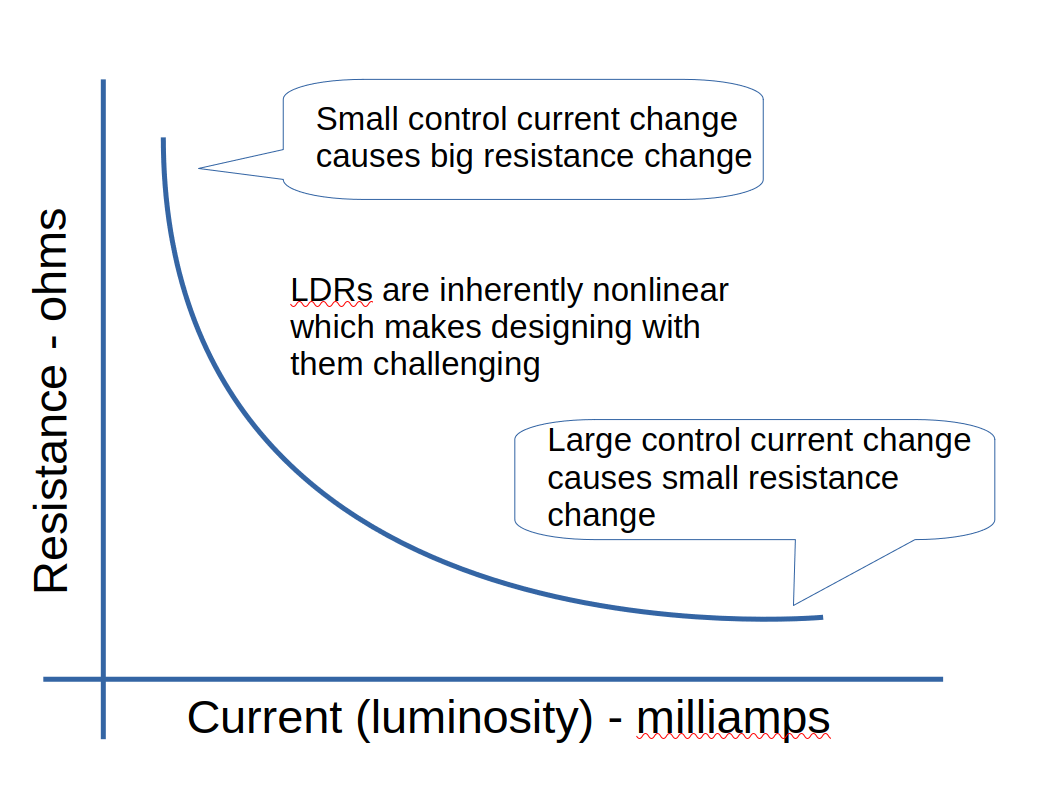
Figure 1. Typical nonlinear LDR behavior
|
The conventional approach to overcoming these LDR challenges is to measure hundreds of LDRs to find sets of matching pairs. However, even when initially matched, LDR behavior can change as they normally age. This can degrade the stereo imaging and sound stage over time and allow channel balance to drift left or right. Moreover, if one of the matched LDRs fails, the preamp might be rendered unusable.
Tortuga Audio introduced in-situ LDR calibration in May, 2014 with the release of its V2 preamp controller. Built-in "auto" calibration of LDRs eliminated the need for testing and matching LDRs. Moreover, it allowed LDRs to be mounted in plug-in modules that are easily replaced should an LDR ever go bad. In-situe LDR calibration is a unique feature of Tortuga Audio preamps.
What happens during calibration?
During calibration, four LDRs are each run through 100 calibration steps resulting in 400 total steps for a full calibration cycle that typically lasts for 10-15 minutes. If a calibration cycle hasn’t finished after 20 minutes, there’s probably a problem with at least 1 of the 4 LDRs.
During each calibration step, the resistance of the LDR is measured and compared to a target value. The target values are dependent on the specific input impedance value that the preamp is currently set at. If the input impedance is subsequently changed to a new value, calibration must be run again to build a new calibration table.
The control settings for each step of each LDR are stored in the controller’s EEPROM memory. These stored control settings are subsequently read from memory during normal operation and are used to set the resistance level of the LDRs (2 LDRs per stereo channel) to achieve the desired volume.
How to run calibration
Calibration is initiated by the user through the infrared remote control. Once initiated by the user, the calibration process runs unattended and is typically completed within 10-15 minutes for all 4 LDRs.
Detailed procedures for running calibration in your Tortuga preamp can be found in the online documentation for your particular controller model. The procedure may vary depending on which preamp controller model (V2, V25, V3, V4 etc.), which firmware version and the type of display your preamp has.
When to run calibration
There’s no fixed requirement for when you should run calibration. You could literally go months or even years without ever needing to run calibration. However, we recommend running calibration once every few months to ensure optimal performance.
If your preamp’s channel balance seems to have drifted either right or left of center, running calibration will most likely recenter the stereo image.
If the calibration process does not complete within a 20 minute period or otherwise stalls or goes into a repeating loop, this is a reliable indication that at least one LDR has gone out of specification and needs to be replaced. The LDRs are easily replaceable plug-in modules.
Calibration best practices
- Interconnect status during calibration
-
During calibration the preamp inputs and outputs are automatically disconnected within the preamp controller. The system is designed so that calbraton can proceed with all interconnect cabling left plugged into the preamp.
However, there may be times when disconnecting the interconnects can be advantageous during calibration. The reason for this is calibration is very sensitive to even modest ground loop currents and the preamp shares a common signal ground with all connected devices. When no sources or amps are connected to the preamp there’s only a single ground connection via the preamp’s power supply. This arrangement minimizes noise and ensures the best results.
- Allow preamp to thermally stabilize
-
LDR’s are sensitive to ambient temperature changes. Therefore, you should avoid running calibration until the preamp has had time to stabilize at room temperature. If you just relocated your LDR preamp from either a hotter or colder location, you should wait at least an hour before starting a calibration cycle.
- Avoid interrupting calibration cycle
-
Interrupting the calibration process won’t harm your preamp but it may result in less than ideal calibration results. If calibration gets interrupted, we suggest you rerun the process and allow it complete normally. Later versions of the firmware will lock-out the preamp from outputting sound until such time as a calibration cycle is successfully completed.
- Run calibration twice at each new impedance level
-
If you establish a new input impedance level in your preamp it’s best to run calibration at least 2 times in a row. The first calibration pass at a new impedance level requires estimating certain values which are then more accurately determinable on subsequent passes.